¶ Workshop 9 May 2024
¶ CMU HPC ERAWAN System
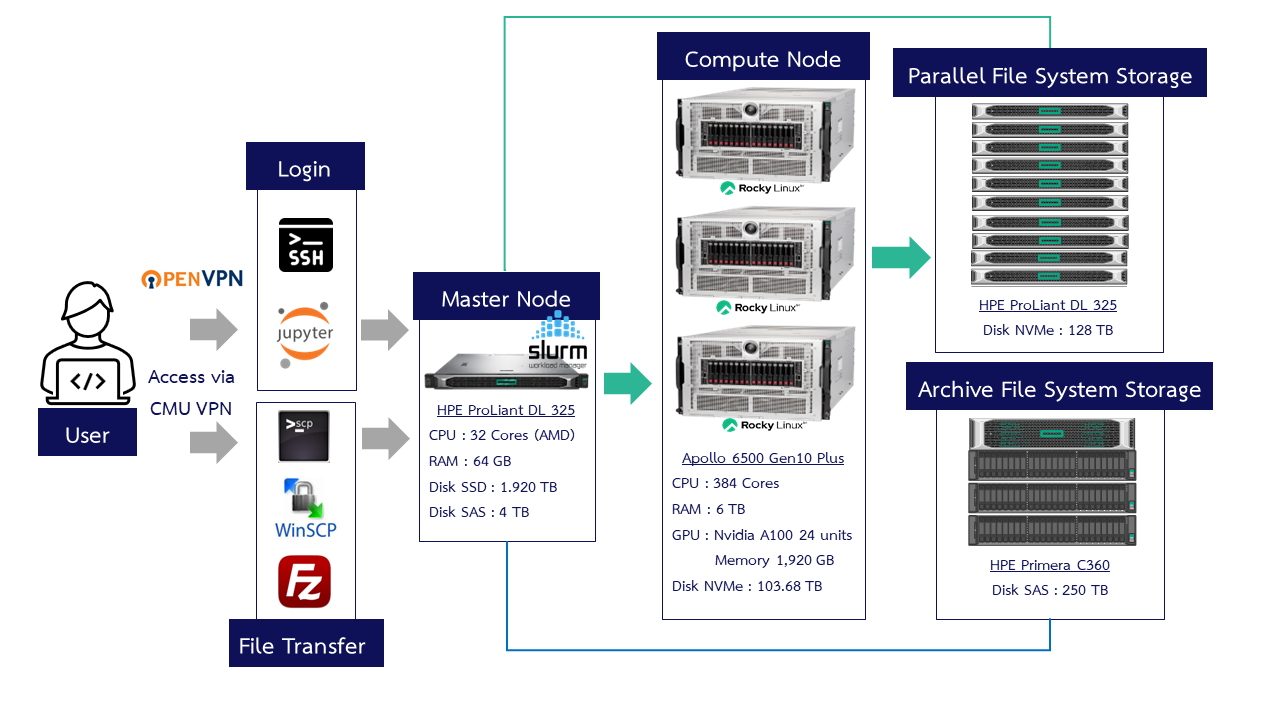
¶ ERAWAN System Access Methods
There are two methods to access the system
- Secure Shell (SSH) via CMD, PowerShell, Terminal or various programs such as Xshell,MobaXterm, Termius, PuTTY
- Jupyter Notebook via a web browser using the URL: https://erawan.cmu.ac.th:8000
System access is restricted to within the Chiang Mai University network or requires the use of CMU VPN.
¶ Secure Shell (SSH)
¶ 1. Access via Terminal
Access can be established through cmd or PowerShell.
Format: ssh [cmu account]@erawan.cmu.ac.th
Example: ssh pxxx.p@cmu.ac.th@erawan.cmu.ac.th
*For the first-time access, you will be prompted for a fingerprint; please respond with yes
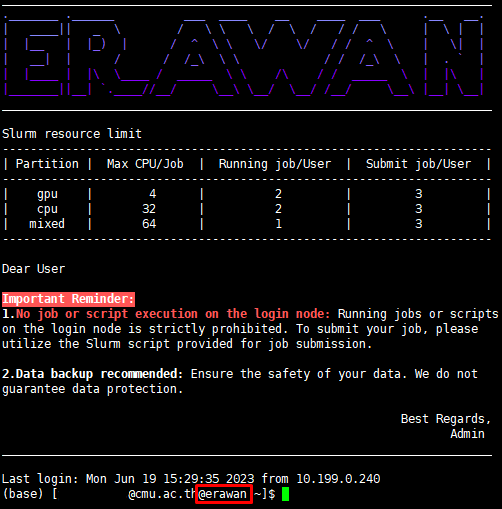
After entering the password, you will access the Erawan HPC system interface as shown in the figure below.
¶ 2.Access via MobaXterm
The MobaXterm program can save the configured server settings, facilitating subsequent access.

Remote host: erawan.cmu.ac.th
username: cmu account
¶ 3. Access via Termius (for MacOS) or the machine's Terminal
Click New Host, and the program will display a Setup window on the right.
Label: (any desired name)
Address: erawan.cmu.ac.th
Group: Optional
Username & password: Enter your CMU Account credentials

¶ Jupyter Notebook
System access via Jupyter Notebook is available through https://erawan.cmu.ac.th:8000
-
- Click the Sign in with CMU Account button to proceed to the CMU Account authentication.

-
- Enter your Username and Password, then click
Acceptto grant access permissions.
- Enter your Username and Password, then click


-
- This leads to the JupyterLab interface, which allows the use of the Terminal, creation/editing of Text, Python, and Python Notebook files, and folder creation.

It is strongly advised not to run large jobs or python code directly through the notebook as this will be executed on the Login node, potentially slowing down the performance and affecting the usage for other users.
(Usage Precautions) Jobs should be run using Slurm via the notebook (Submitting Slurm Jobs via JupyterHub)
¶ Transferring Files to the HPC Erawan
¶ scp command
Command Format
File : scp [file] [cmu account]@erawan.cmu.ac.th:/path/directory
$ scp "Multi boot nini Windows7.rar" sxxx.a@cmu.ac.th@erawan.cmu.ac.th:/home/pxxx.p

Folder : scp -r [./directory] [cmu account]@erawan.cmu.ac.th:/path/directory
$ scp -r ./folderName pxxx.p@cmu.ac.th@erawan.cmu.ac.th:/home/pxxx.p/folderName
Copy from server to Local : scp [cmu account]@erawan.cmu.ac.th:/path/directory [/local/directory]
$ scp pxxx.p@cmu.ac.th@erawan.cmu.ac.th:/home/pxxx.p/folderName ./folderName
¶ โปรแกรม
Programs such as WinSCP, FileZilla, MobaXterm, Termius can be used for transferring files to the Server.
¶ Basic Linux Command
| Command | Example | รายละเอียด |
|---|---|---|
| ls | ls | List files and directories |
| pwd | pwd | Print working directory |
| mkdir | mkdir new_directory | Make a new directory |
| cd | cd new_directory | Change directory |
| touch | touch file1 | Create a new file |
| cat | cat file1 | Concatenate and display file content |
| cp | cp file1 file2 | Copy a file |
| mv | mv file1 /home/name | Move or rename a file |
| rm | rm file2 | Remove a file |
| vi, vim, nano | vi file1 | Edit a file using a text editor |
<<command>> -- help Display help information
man <<command>> Display the command's manual page
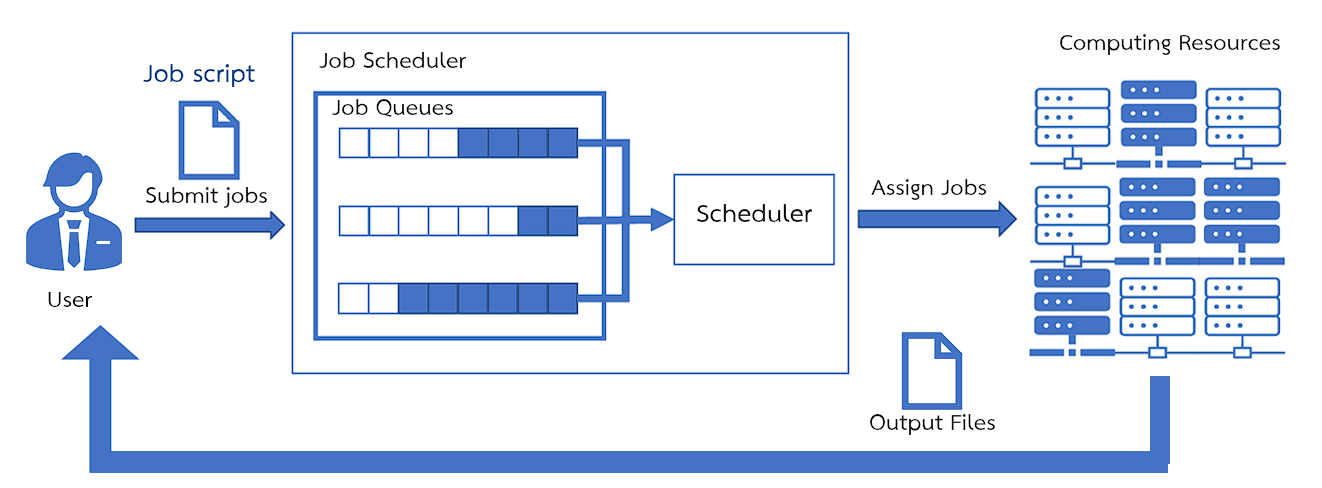
¶ SLURM : Simple Linux Utility for Resource Management
SLURM is a Job scheduler software responsible for job sequencing.
- The user must submit a Job script through the Login node to enter the queue in Slurm, waiting for execution.
- Slurm will then send the job to run on the Compute node according to the Partition specified in the Job script file.
- Upon completion of processing, the results will be stored in the location from which the job was run.
¶ Partition and Queue
- The CMU HPC ERAWAN system is divided into the following Partitions for usage
| Partition | Node | CPU | GPU | Time Limit | Max CPU/Job | Running Job/User | Submit Job/User |
|---|---|---|---|---|---|---|---|
| CPU | 2 | 192 | - | 168 hours | 32 | 2 | 3 |
| GPU | 2 | 64 | 16 | 168 hours | 4 | 2 | 3 |
| Mixed | 1 | 128 | 8 | 24 hours | 64 | 1 | 2 |
¶ Basic Slurm Commands
| Commands | Syntax | Description |
|---|---|---|
sinfo |
sinfo |
Command to view system resource information |
squeue |
squeue -u <user> |
Command to view the job queue |
scancel |
scancel <job-id> |
Command to cancel a job |
scontrol |
scontrol show job <job-id |
Command to display detailed job information |
scontrol show partition <patition> |
Command to display detailed partition information | |
srun |
srun <option> |
Command for Interactive job execution |
sbatch |
sbatch <file slurm script> |
Command to submit a batch job |
¶ sinfo
sinfo
Output
PARTITION AVAIL  TIMELIMIT  STATE		NODESLIST  	CPU(A/I/O/T) 	MAX_CPUS_PER_NODE		GRES_USED
gpu*         up 7-00:00:00   mix			compute1		77/51/0/128								32				gpu:7
gpu*         up 7-00:00:00   mix			compute2		9/119/0/128								32				gpu:6
cpu          up 7-00:00:00   mix			compute1		77/51/0/128								96				gpu:7
cpu          up 7-00:00:00   mix			compute2		9/119/0/128								96				gpu:6
mixed        up 1-00:00:00	idle			compute3		0/128/0/128							 128				gpu:0
(*) default If no partition is specified, the gpu partition will be used automatically.
PARTITION: Resource allocation scheme or group of machine types <See details for ERAWAN>
AVAIL: Availability of the machine group
TIMELIMIT: Maximum time a job can run
STATE: Machine status
NODELIST: Machine name(s)
CPU(A/I/O/T): CPU counts (Allocated/Idle/Other/Total)
MAX_CPUS_PER_NODE: Maximum number of CPUs per node
GRES_USED: Number of GPUs currently in use
Machine Status
| State | Description |
|---|---|
| idle | Machine is ready for use; no jobs are reserved. |
| alloc | Machine is fully utilized; cannot be used to run new jobs. |
| mix | Machine is partially reserved/in use; some capacity is still available. |
| down | Machine is unavailable for use. |
| drain | Machine is unavailable for use due to system issues. |
¶ squeue
Syntax: squeue -u <user>
squeue -u pxxx.p
Output
JOBID PARTITION     NAME     USER ST       TIME  NODES NODELIST(REASON)
3649       gpu  dmso-20   user25  R 5-22:28:28      1 	compute1
3547   michael    c1-sa   user25  R 10-18:43:34     1 	compute1
JOBID: Job ID number
PARTITION: Resource allocation scheme or group of machine types <See details for ERAWAN>
NAME: Job name
USER: User who submitted the job
ST: Job status
NODELIST: Machine name(s)
(REASON): Reason the job cannot run
Job Status (ST)
| Status | Code | Description |
|---|---|---|
| RUNNING | R |
Job is currently allocated to a node and running. |
| PENDING | PD |
Job is waiting for resource allocation. |
| FAILED | F |
Job could not be executed. |
| COMPLETED | CD |
Job has finished successfully. |
| COMPLETING | CG |
Job is about to finish, but some processes are still running. |
Reasons for Job Not Running (REASON)
| Reason Code | Description |
|---|---|
Priority |
There are higher priority jobs in the queue waiting to run. Your job will run once those jobs are completed. |
Resources |
The job is waiting for necessary resources. It will start when resources become available. |
QOSGrpCpuLimit |
All CPUs allocated for your job's Quality of Service (QoS) are currently in use. The job will run when a CPU becomes available. |
QOSGrpMaxJobsLimit |
The maximum number of jobs for your job's QoS has been reached. The job will run when another job completes. |
QOSMaxJobsPerUserLimit |
The maximum number of jobs a user can run under the specified QoS has been reached. The job will run when another user job completes. |
¶ scancel
Syntax: scancel <job-id>
scancel 3700
You cannot cancel jobs submitted by other users.
¶ scontrol
syntax: scontrol show job <job-id>
scontrol show job 3700
output
JobId=3700 JobName=M_xqc_L506_64
   UserId=user41(1059) GroupId=users(100) MCS_label=N/A
   Priority=4294901595 Nice=0 Account=training QOS=normal
   JobState=RUNNING Reason=None Dependency=(null)
   Requeue=1 Restarts=0 BatchFlag=1 Reboot=0 ExitCode=0:0
   RunTime=19:51:35 TimeLimit=1-00:00:00 TimeMin=N/A
   SubmitTime=2023-06-06T13:48:13 EligibleTime=2023-06-06T13:48:13
   AccrueTime=2023-06-06T13:48:13
   StartTime=2023-06-06T13:48:13 EndTime=2023-06-07T13:48:13 Deadline=N/A
   SuspendTime=None SecsPreSuspend=0 LastSchedEval=2023-06-06T13:48:13 Scheduler=Main
   Partition=short AllocNode:Sid=erawan:1763199
   ReqNodeList=(null) ExcNodeList=(null)
   NodeList=compute3
   BatchHost=compute3
   NumNodes=1 NumCPUs=64 NumTasks=64 CPUs/Task=1 ReqB:S:C:T=0:0:*:*
   TRES=cpu=64,node=1,billing=64
   Socks/Node=* NtasksPerN:B:S:C=0:0:*:1 CoreSpec=*
   MinCPUsNode=1 MinMemoryNode=1T MinTmpDiskNode=0
   Features=(null) DelayBoot=00:00:00
   OverSubscribe=OK Contiguous=0 Licenses=(null) Network=(null)
   Command=/home/user41/natthiti/job/MOF/xqc_L506_64/run_g16_Erawan_230605.sub
   WorkDir=/home/user41/natthiti/job/MOF/xqc_L506_64
   StdErr=/home/user41/natthiti/job/MOF/xqc_L506_64/slurm-3700.out
   StdIn=/dev/null
   StdOut=/home/user41/natthiti/job/MOF/xqc_L506_64/slurm-3700.out
   Power=
syntax: scontrol show partition <partition>
scontrol show partition cpu
output
PartitionName=cpu
   AllowGroups=ALL AllowAccounts=ALL AllowQos=ALL
   AllocNodes=ALL Default=NO QoS=cpu
   DefaultTime=NONE DisableRootJobs=NO ExclusiveUser=NO GraceTime=0 Hidden=NO
   MaxNodes=UNLIMITED MaxTime=7-00:00:00 MinNodes=0 LLN=NO MaxCPUsPerNode=96
   Nodes=compute[1-2]
   PriorityJobFactor=1 PriorityTier=1 RootOnly=NO ReqResv=NO OverSubscribe=NO
   OverTimeLimit=NONE PreemptMode=OFF
   State=UP TotalCPUs=256 TotalNodes=2 SelectTypeParameters=NONE
   JobDefaults=(null)
   DefMemPerNode=UNLIMITED MaxMemPerNode=UNLIMITED
   TRES=cpu=256,mem=4000000M,node=2,billing=256,gres/gpu=16
¶ srun
- For submitting a job.
syntax:srun <option> <executable_path>
srun --partition=gpu --ntasks-per-node=2 --gres=gpu:1 python3 test.py
- For Interactive job allocation
syntax:srun <option> --pty bash
srun --partition=gpu --ntasks-per-node=2 --gres=gpu:1 --pty bash
option
| Full | Short |
|---|---|
--partition=name_partition |
-p name_partition |
--nodes=num_node |
-N num_node |
--ntasks=num_task |
-n num_task |
--ntasks-per-node=num_task |
|
--cpus-per-task=num_cores |
-c num_cores |
--mem=num_mem |
|
--time=hh:mm:ss |
-t hh:mm:ss |
--gres=gpu:num_gpu |
¶ sbatch
Syntax: sbatch <file slurm script>
$sbatch test.sh
Output
Submitted batch job <job-id>
¶ Sbatch (Submitting Job)
Bash Script Commands for Slurm File Creation
man sbatchorsbatch -helpor sbatch documentation
¶ Procedure for Job Submission
- Create a bash script file in the desired execution path.
$ vi script.sh
- Specify the required resource details and save the file.
#!/bin/bash

#SBATCH --job-name=test     		## Job name
#SBATCH --output=test_%j.out    ## Output file name (%j = Job-ID)
#SBATCH --error=test_%j.err   	## Error file name (%j = Job-ID)
#SBATCH --time=10:00          	## Run time limit
#SBATCH --ntasks=1            	## Number of tasks required for the run
#SBATCH --cpus-per-task=1     	## Number of cores (threads/CPUs) required for the run
#SBATCH --partition=cpu         ## Specify the required partition

module purge                    ## Unload all modules because modules may have been loaded previously
module load anaconda3           ## Load the required module, in this example, Anaconda

srun python script.py           ## Execute the code
Notes
- For submitting a job utilizing threads, set #SBATCH --cpus-per-task= according to the number of threads used.
- For submitting a job using MPI, set #SBATCH --ntasks= according to the required number of processes.
- For submitting a GPU-centric job to the GPU partition, set #SBATCH --cpus-per-task according to appropriateness. If the job does not spawn threads, set it to 1. If it spawns threads, it can be set between 2-4 threads to share the remaining cores with other cards, thus ensuring full utilization of the system capabilities.
- Use the sbatch command followed by the bash script name to submit the job to SLURM.
$ sbatch script.sh
¶ Slurm usage on JupyterHub
%load_ext slurm_magic
Test Slurm command usage
sinfo
squeue
Test Slurm script usage
%%sbatch
#!/bin/bash

#SBATCH --job-name=test
#SBATCH --output=test_%j.out
#SBATCH --error=test_%j.err
#SBATCH --cpus-per-task=1
#SBATCH --partition=cpu

python --version
¶ Additional Option Details
¶ Job Name, Input, Output, Working Directory
| Sbatch option | Description |
|---|---|
-J, --job-name=<job_name> |
Assign a name to the job |
-o, --output=<filename_pattern> |
Output file %x : Job name %j : Job-ID %t : Task identifier. %N : Short hostname. |
-e, --error=<filename_pattern> |
Error file |
¶ Notifications
| Sbatch option | Description |
|---|---|
--mail-user=<email> |
Receive notifications via email |
--mail-type=[TYPE\|ALL\|NONE] |
Email types: BEGIN, END, FAIL. --mail-type BEGIN, END, FAIL |
¶ Time Limits
| Sbatch option | Description |
|---|---|
--time=<time> |
Set the maximum runtime for the job |
-b, --begin=<time> |
Set the desired job start time |
¶ Memory Allocation
| Sbatch option | Description |
|---|---|
--mem=<size>[units] |
Set the required memory per node |
--mem-per-cpu=<size>[units] |
Set the required memory per CPU |
--mem-per-gpu=<size>[units] |
Set the required memory per GPU |
¶ Nodes, Tasks, and CPUs
| Sbatch option | Description |
|---|---|
-n, --ntasks=<number> |
Number of tasks/processes |
-N, --nodes=<minnodes>[-maxnodes] |
Number of nodes |
--ntasks-per-node=<ntasks> |
Run ntasks per node |
-c, --cpus-per-task=<ncpus> |
Run ncpus per task/process |
-p, --partition=<partition_names> |
Specify the required partition(s) |
-w, --nodelist=<node_name_list> |
Specify the required node(s) |
¶ GPUs
| Sbatch option | Description |
|---|---|
--gpus=[type:]<number> |
Specify the total number of GPUs required for the job |
--gpus-per-node=[type:]<number> |
Specify the number of GPUs required for the job on each node |
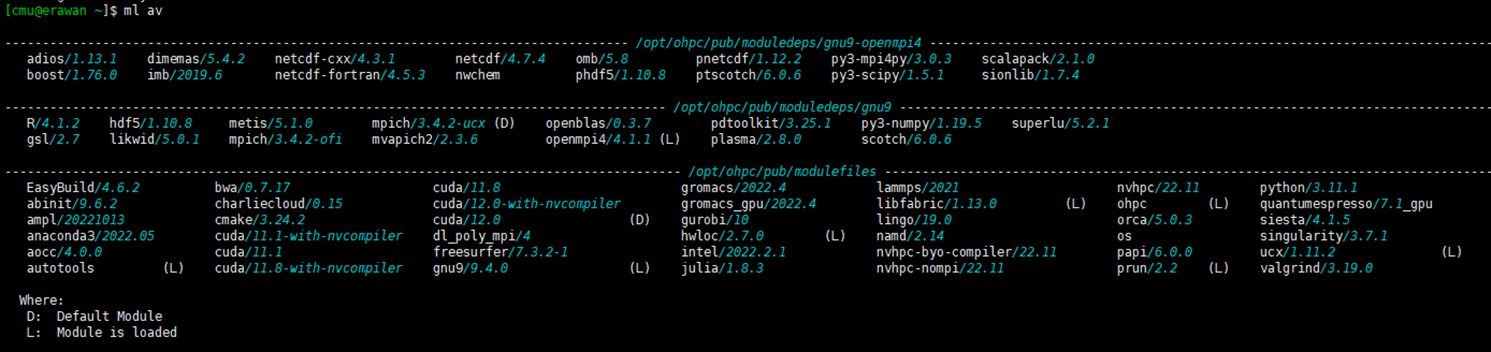
¶ Software Usage on HPC Erawan System
The HPC Erawan system has pre-installed software. You can check the list of available software using the command:
$ module avail
# or
$ ml av
¶ How to Load Software
Command: module load [program name]
$ module load anaconda3
¶ Check Loaded Software
Command: module list or ml
$ module list

¶ How to Unload Software
Command: module unload [ชื่อโปรแกรม]
module unload anaconda3

You can install your own software in your personal space (/home or /project) provided the software is legally licensed
¶ Resource Monitoring
In addition to the sinfo and squeue commands, there are commands for viewing resource and process usage
There are two types of commands
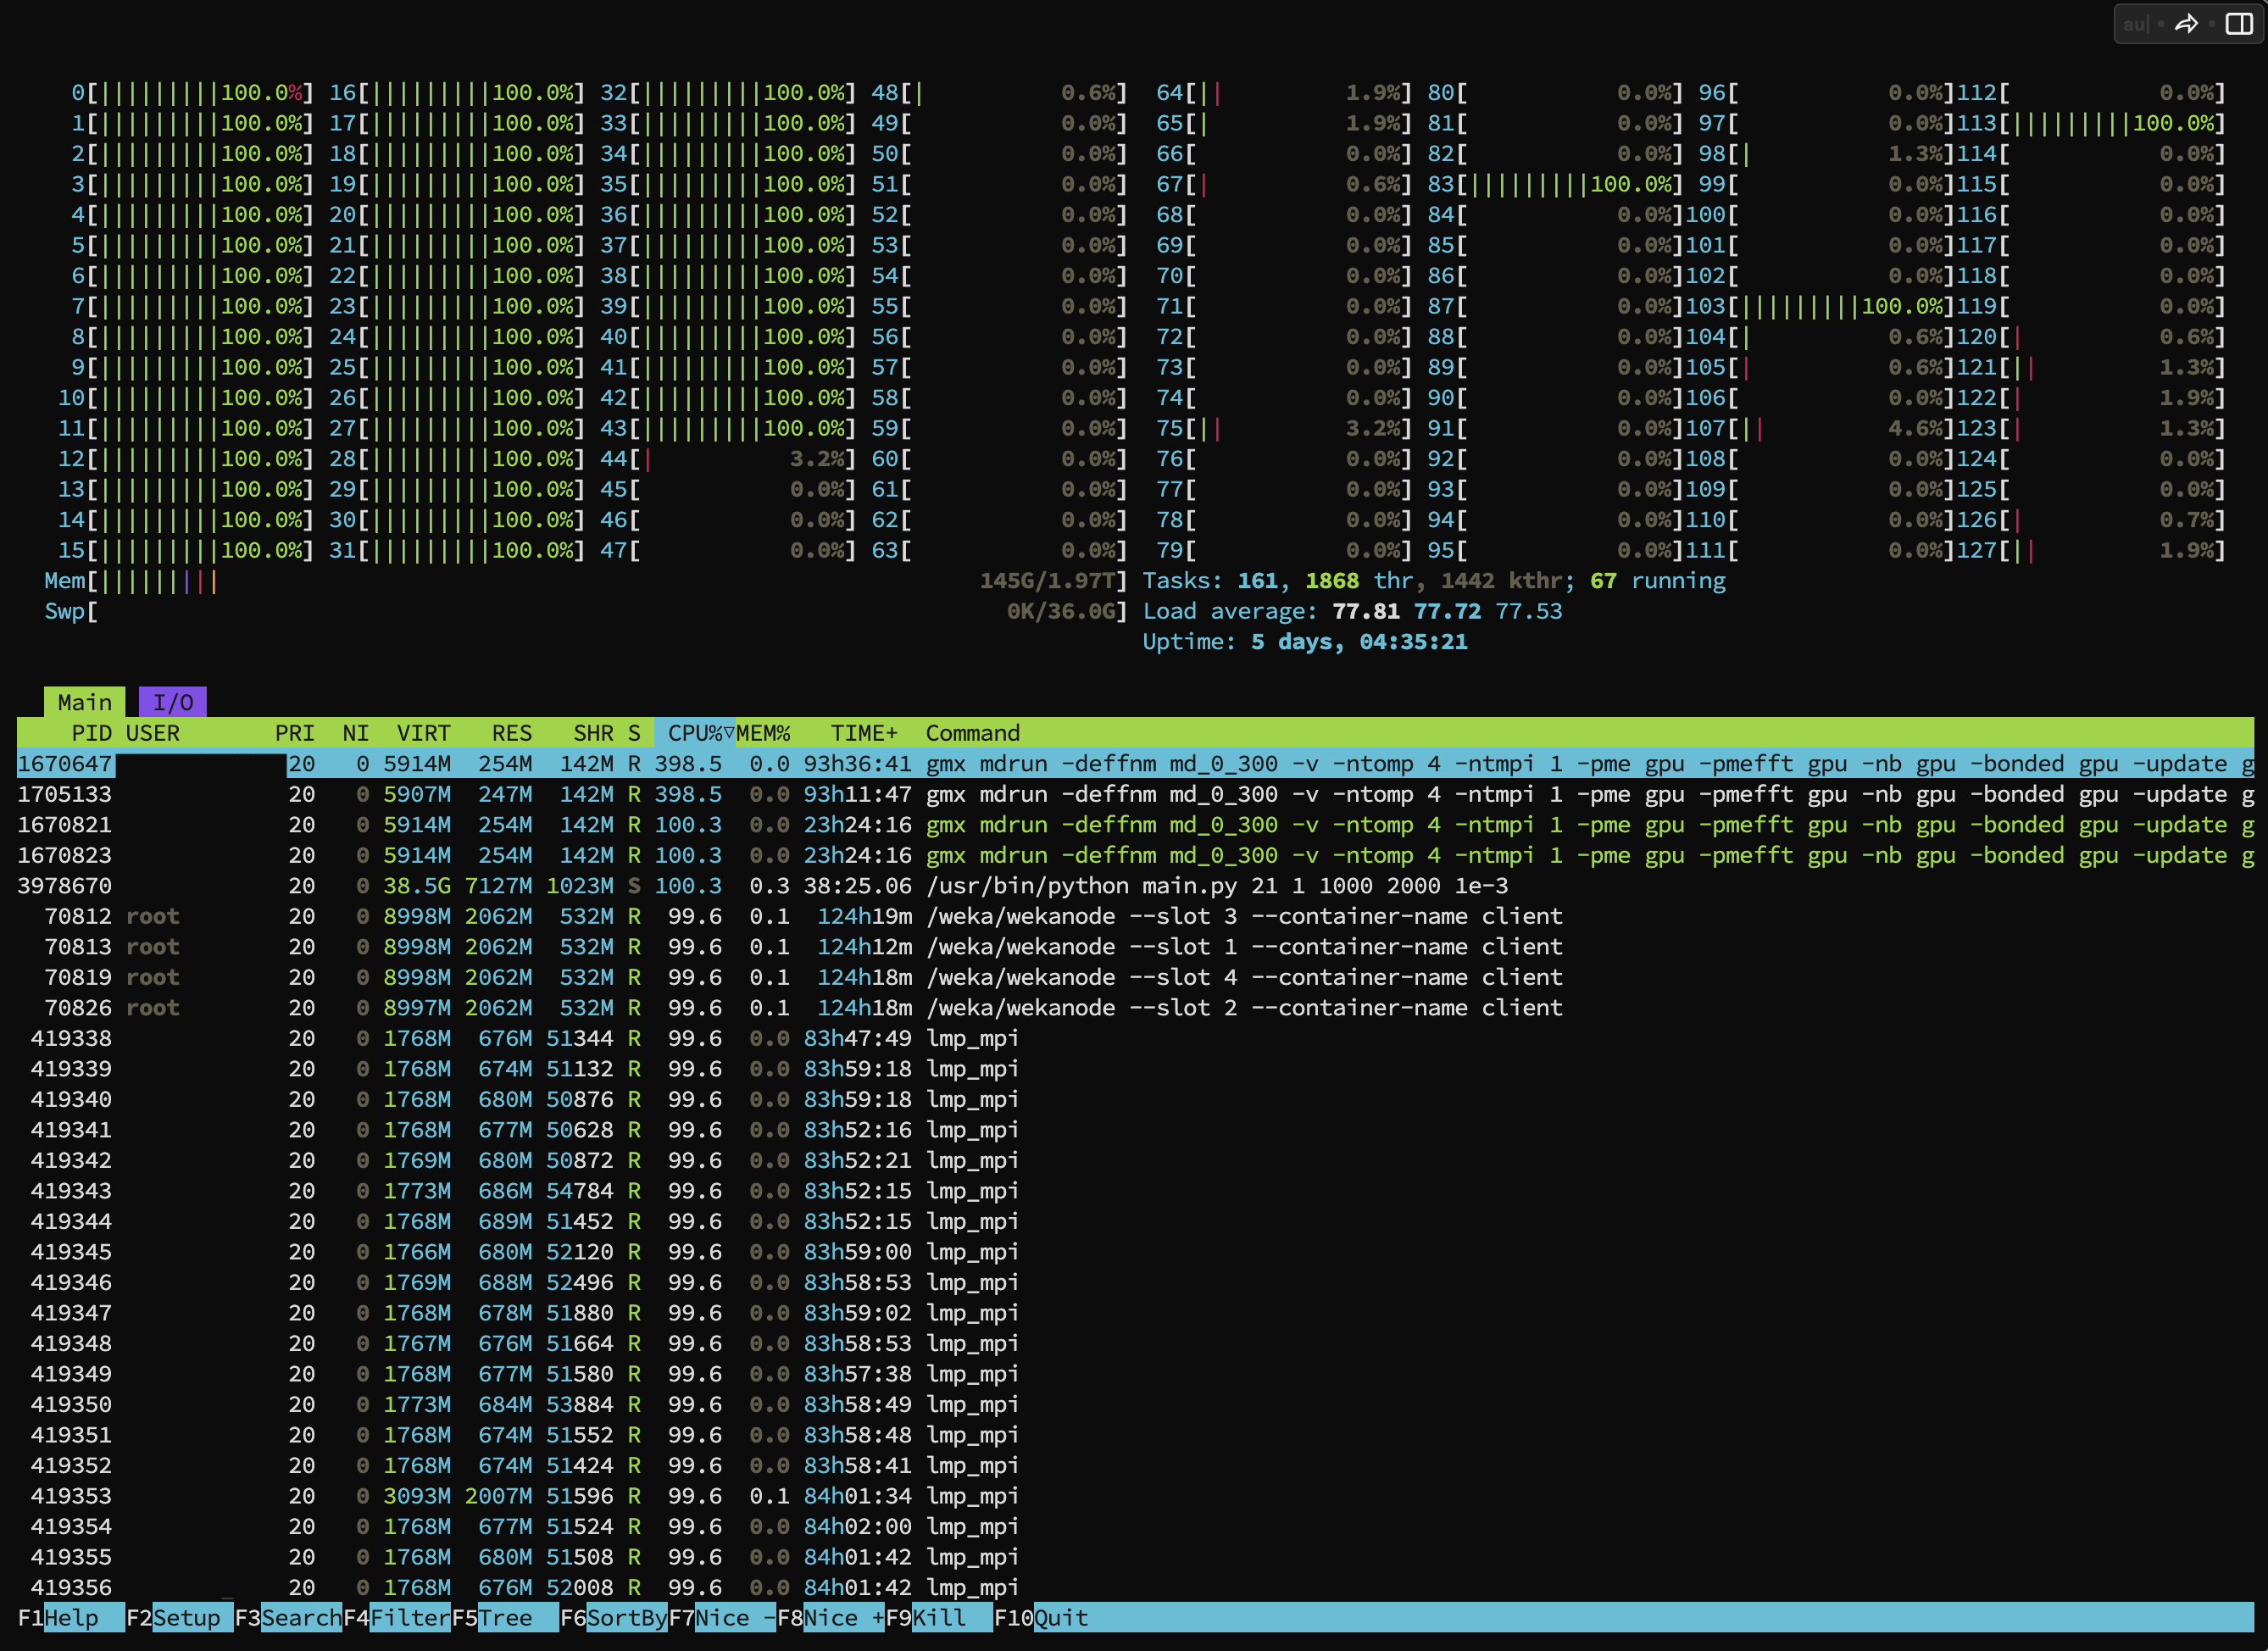
- View CPU & Memory processes with the command
htopcX - View GPU processes with the command
nvtopcX
*Note: Replace X with the machine number (Erawan system has 4 machines: c1-c4).
Example: Command usage to view CPU & Memory activity
$ htopc1
Example: Command usage to view GPU activity: You can see the GPU utilization of your running jobs from the bottom bar.
$ nvtopc2

¶ Example
Download Workshop
git clone https://github.com/Pornnapa-Panyadee/HPC_Workshop_9May.git
¶ 0. Create ENV
conda create -n testenv python=3.10
conda activate testenv

----  Check version env  ----------------
python
exit()
----  End check version env  ------------

conda deactivate
----  Check version with out env --------
python
exit()
----  End check version with out env ----
Test env with slurm script
cd HPC_Workshop_9May/E0_Create_env
vim run.sh
#!/bin/bash
#SBATCH --job-name=E0
#SBATCH --partition=cpu
#SBATCH --output=%j.out
#SBATCH --error=%j.err

source $HOME/.bashrc
conda activate testenv

python3 checkversion.py
¶ 1. Check GPU Available in Pytorch
¶ srun (interactive)
Navigate to Folder E1_Pytorch
cd HPC_Workshop_9May/E1_Pytorch
Test Interactive RUN with the command
srun -p gpu --gres=gpu:1 --cpus-per-task=1 --pty bash
python3

import torch
torch.cuda.device_count()
torch.cuda.is_available()
torch.cuda.get_device_name(0)
X_train = torch.FloatTensor([0., 1., 2.])
X_train = X_train.cuda()
print(X_train)
If it fails to run or does not find the GPU
1.Check that the environment prompt on the account does not display (base).
2.If it displays (base), execute:conda deactivateandconda config --set auto_activate_base False(Set to not auto activate the base environment).
¶ sbatch
- Create a file for running python
vim runPytorch.py
import torch

print(torch.cuda.device_count())
print(torch.cuda.is_available())
print(torch.cuda.get_device_name(0))
X_train = torch.FloatTensor([0., 1., 2.])
X_train = X_train.cuda()
print(X_train)
- Create a bash script file in the desired run path, specifying required resource details
vim run.slurm
#!/bin/bash

#SBATCH --job-name=E1
#SBATCH --output=%j.out
#SBATCH --error=%j.err
#SBATCH --cpus-per-task=1
#SBATCH --partition=gpu
#SBATCH --gpus=1

python3 runPytorch.py
**If an environment has been created, add the following code to the slurm script before running **
source $HOME/.bashrc
conda activate testpytorch
- Use the
sbatchcommand followed by the bash script name to submit the job to SLURM
sbatch run.slurm
¶ 2. Multi-GPU Training with PyTorch & Using Conda Environment
ref. Multi-GPUs Training with PyTorch on LANTA -- Distributed Data-Parallel (DDP)
Navigate to Folder E2_MultiGPU_Pytorch
cd ../E2_MultiGPU_Pytorch
- Create Python Environment (Installation takes time)
module load anaconda3
conda create -n testpytorch python=3.10 torchvision torchaudio pytorch-cuda=12.1 -c pytorch-nightly -c nvidia
- Create file DDP.py
vim DDP.py
def setup(rank, world_size):
    # initialize the process group
    dist.init_process_group("nccl", rank=rank, world_size=world_size)


def main():
****-----------------------------------------------------------------------------
    world_size    = int(os.environ["WORLD_SIZE"])
    rank          = int(os.environ["SLURM_PROCID"])
    gpus_per_node = int(os.environ["SLURM_GPUS_ON_NODE"])
****-----------------------------------------------------------------------------

    assert gpus_per_node == torch.cuda.device_count()
    print(f"Hello from rank {rank} of {world_size} on {gethostname()} where there are" \
          f" {gpus_per_node} allocated GPUs per node.", flush=True)

    setup(rank, world_size)
    if rank == 0: print(f"Group initialized? {dist.is_initialized()}", flush=True)
    local_rank = rank - gpus_per_node * (rank // gpus_per_node)
    torch.cuda.set_device(local_rank)
    print(f"host: {gethostname()}, rank: {rank}, local_rank: {local_rank}")
    train_sampler = torch.utils.data.distributed.DistributedSampler(dataset1, num_replicas=world_size, rank=rank)


****-----------------------------------------------------------------------------
    train_loader = torch.utils.data.DataLoader(dataset1, batch_size=args.batch_size, sampler=train_sampler,num_workers=int(os.environ["SLURM_CPUS_PER_TASK"]), pin_memory=True)
    test_loader = torch.utils.data.DataLoader(dataset2, **test_kwargs)
****-----------------------------------------------------------------------------
The world_size is actually the total number of GPUs available on the required node(s)
- Download Data set
conda activate testpytorch
(testpytorch) $ python3
>>> import torch
>>> from torchvision import datasets, transforms
>>> transform=transforms.Compose([
        transforms.ToTensor(),
        transforms.Normalize((0.1307,), (0.3081,))
        ])
>>> dataset1 = datasets.MNIST('data', train=True, download=True, transform=transform)
>>> exit()
- Create file run.slurm
vim run.slurm
#!/bin/bash
#SBATCH --job-name=E2
#SBATCH --partition=mixed
#SBATCH --ntasks-per-node=2
#SBATCH --cpus-per-task=2
#SBATCH --gpus=1
#SBATCH --output=%j.out
#SBATCH --error=%j.err


export MASTER_PORT=$(expr 10000 + $(echo -n $SLURM_JOBID | tail -c 4))
echo "MASTER_PORT="$MASTER_PORT

export WORLD_SIZE=1   #$SLURM_NNODES * $SLURM_NTASKS_PER_NODE
echo "WORLD_SIZE="$WORLD_SIZE

master_addr=$(scontrol show hostnames "$SLURM_JOB_NODELIST" | head -n 1)
export MASTER_ADDR=$master_addr
echo "MASTER_ADDR="$MASTER_ADDR

python3 DDP.py
**If no environment has been created, comment out the following code in the slurm script before running **
##source $HOME/.bashrc
##conda activate testpytorch
- Submit the job
sbatch run.slurm
output
MASTER_PORT=14365
WORLD_SIZE=1
MASTER_ADDR=compute3
Hello from rank 0 of 1 on compute3.localdomain where there are 1 allocated GPUs per node.
Group initialized? True
host: compute3.localdomain, rank: 0, local_rank: 0
Train Epoch: 1 [0/60000 (0%)]   Loss: 2.318261
Train Epoch: 1 [640/60000 (1%)] Loss: 1.257489
Train Epoch: 1 [1280/60000 (2%)]        Loss: 0.740961
Train Epoch: 1 [1920/60000 (3%)]        Loss: 0.504051
Train Epoch: 1 [2560/60000 (4%)]        Loss: 0.323792
Train Epoch: 1 [3200/60000 (5%)]        Loss: 0.330681
Train Epoch: 1 [3840/60000 (6%)]        Loss: 0.297750
Train Epoch: 1 [4480/60000 (7%)]        Loss: 0.213747
Train Epoch: 1 [5120/60000 (9%)]        Loss: 0.206334
Train Epoch: 1 [5760/60000 (10%)]       Loss: 0.176185
Train Epoch: 1 [6400/60000 (11%)]       Loss: 0.523220
Train Epoch: 1 [7040/60000 (12%)]       Loss: 0.159854
.
.
.
Train Epoch: 14 [55680/60000 (93%)]     Loss: 0.007110
Train Epoch: 14 [56320/60000 (94%)]     Loss: 0.039843
Train Epoch: 14 [56960/60000 (95%)]     Loss: 0.001957
Train Epoch: 14 [57600/60000 (96%)]     Loss: 0.006067
Train Epoch: 14 [58240/60000 (97%)]     Loss: 0.051391
Train Epoch: 14 [58880/60000 (98%)]     Loss: 0.004421
Train Epoch: 14 [59520/60000 (99%)]     Loss: 0.006927

Test set: Average loss: 0.0267, Accuracy: 9914/10000 (99%)
¶ 3. Software : GROMACS
- Download gromac on GPU
cd HPC_Workshop_9May/E3_Gromacs
- Preparation (Grompp)
module load gromacs_gpu
gmx grompp -f pme_verlet.mdp -o pme_verlet.tpr
- Create Slurm script file
vim gromac.slurm
#!/bin/bash

#SBATCH -J gromacs
#SBATCH --gpus=1
#SBATCH -p gpu
#SBATCH -o %j.out
#SBATCH --cpus-per-task=4

module load gromacs_gpu

gmx mdrun -deffnm pme_verlet -v -nsteps 100000
- submit slurm
sbatch gromac.slurm
¶ Singularity
Singularity is a container system used on the HPC system, functioning similarly to Docker.
Resources
NGC NVIDIA Container Registry (Container source) https://ngc.nvidia.com/catalog/containers
Docker hub Docker Container Registry (Container source) https://hub.docker.com/
¶ Local
You can view the list of already downloaded containers at: ls /opt/ohpc/pub/apps/singularity
- Quantum ESPRESSO
This is a computer program for atomistic simulations in quantum chemistry and solid-state physics, capable of simulating various systems.
cd HPC_Workshop_9May/S1_QE
vim qe.sh
qe.sh
#!/bin/bash
#SBATCH --gpus=1
#SBATCH -w compute2
#SBATCH --job-name=qegpu
#SBATCH -p gpu
#SBATCH -o %j.out
#SBATCH --ntasks=1

singularity run --nv /opt/ohpc/pub/apps/singularity/quantum_espresso_qe-7.1.sif mpirun pw.x -inp input.in > output.out
sbatch qe.sh
¶ Download
- Tensorflow
cd HPC_Workshop_9May/S2_Tensorflow
module load singularity
singularity pull tensorflow.sif docker://nvcr.io/nvidia/tensorflow:22.12-tf1-py3
vim test_tensorflow.py
test_tensorflow.py
import tensorflow as tf
# Check for GPU availability
if tf.config.list_physical_devices('GPU'):
   # Configure TensorFlow to use the first available GPU
   physical_devices = tf.config.list_physical_devices('GPU')
   tf.config.experimental.set_memory_growth(physical_devices[0], True)
   logical_devices = tf.config.list_logical_devices('GPU')
   print("Using GPU: {}".format(logical_devices[0]))
else:
   print("No GPU available, defaulting to CPU.")

# Define some sample data
x = tf.constant([[1., 2.], [3., 4.]], dtype=tf.float32)
y = tf.constant([[5., 6.], [7., 8.]], dtype=tf.float32)

# Perform matrix multiplication on GPU (if available)
with tf.device("/GPU:0" if tf.config.list_physical_devices('GPU')
  else "/CPU:0"): z = tf.matmul(x, y)

# Print the result
print(z.numpy())
vim run.sh
run.sh
#!/bin/bash

#SBATCH -J testTen
#SBATCH -o %j.out
#SBATCH -e test_%j.err
#SBATCH -c 1
#SBATCH -p gpu
#SBATCH --gpus=1

module purge
module load singularity

singularity run --nv /opt/ohpc/pub/apps/singularity/tensorflow_latest-gpu.sif python test_tensorflow.py

##singularity exec --nv tensorflow_23.sif  python tensorflow.py
¶ Running Jupyter Notebook via ssh tunneling
- Create
jupyter.sh
vim jupyter.sh
#!/bin/bash
#SBATCH --job-name=jupyter
#SBATCH --gpus=1
#SBATCH --time=02:00:00

cat /etc/hosts
port=$(shuf -i 6000-9999 -n 1)
jupyter lab --ip=0.0.0.0 --port=$port
The variable
$portspecifies the port for JupyterHub to run on. You may set the number manually, using a high number to avoid conflicts with other services, especially those below 1024.
Alternatively, use the formula:port=$(shuf -i 6000-9999 -n 1)
- Submit job
sbatch jupyter.sh
- Once the Job is Running (R), check the output for the machine it is running on, along with the token in the Slurm output.
- Establish an SSH tunnel on the local machine to the port specified for Jupyter during job submission:
ssh -L 9999:10.98.4.1x:<port> <cmu account>@erawan.cmu.ac.th
- Open Jupyter Hub at http://localhost:9999
Example code
from tensorflow.python.client import device_lib
print(device_lib.list_local_devices())
Add the virtualenv as a jupyter kernel
conda activate [env-name]
ipython kernel install --user --name=[env-name]

or
python -m ipykernel install --user --name [env-name] --display-name "Python ([env-name])"